TeamTracker User Guide
Welcome to TeamTracker, your ultimate solution for managing contacts and tasks!
Designed with simplicity in mind, TeamTracker seamlessly combines the ease of a Graphical User Interface (GUI) with the efficiency of a Command Line Interface (CLI), catering to users of all technical abilities.
Tailored for individuals with fast typing speeds who prefer keyboard-centric navigation to mouse-driven interfaces, TeamTracker is the ideal solution for anyone looking to enhance their task management workflow.
Don't worry if you are not tech-savvy – TeamTracker is designed for effortless use, whether you are a coding geek or just getting started. Our intuitive interface makes task and contact management a breeze, so you can focus on what matters most without any hassle.
This User Guide serves as your comprehensive resource for mastering TeamTracker's features and maximizing its potential. Whether you're a seasoned pro or new to task management software, this guide will equip you with the knowledge needed to harness the full capabilities of TeamTracker.
Quick start
Install and launch application
Ensure you have Java
11or above installed in your Computer. Runjava -versionon your command terminal to check your Java version.Download the latest
TeamTracker.jarfrom here.Copy the file to the folder you want to use as the home folder for your TeamTracker.
Open a command terminal,
cdinto the folder you put the jar file in, and use thejava -jar TeamTracker.jarcommand to run the application (if you are not sure how to use the command terminal, refer to this section for a more detailed guide).
A GUI similar to the below should be displayed in a few seconds. Note how the app contains some sample data.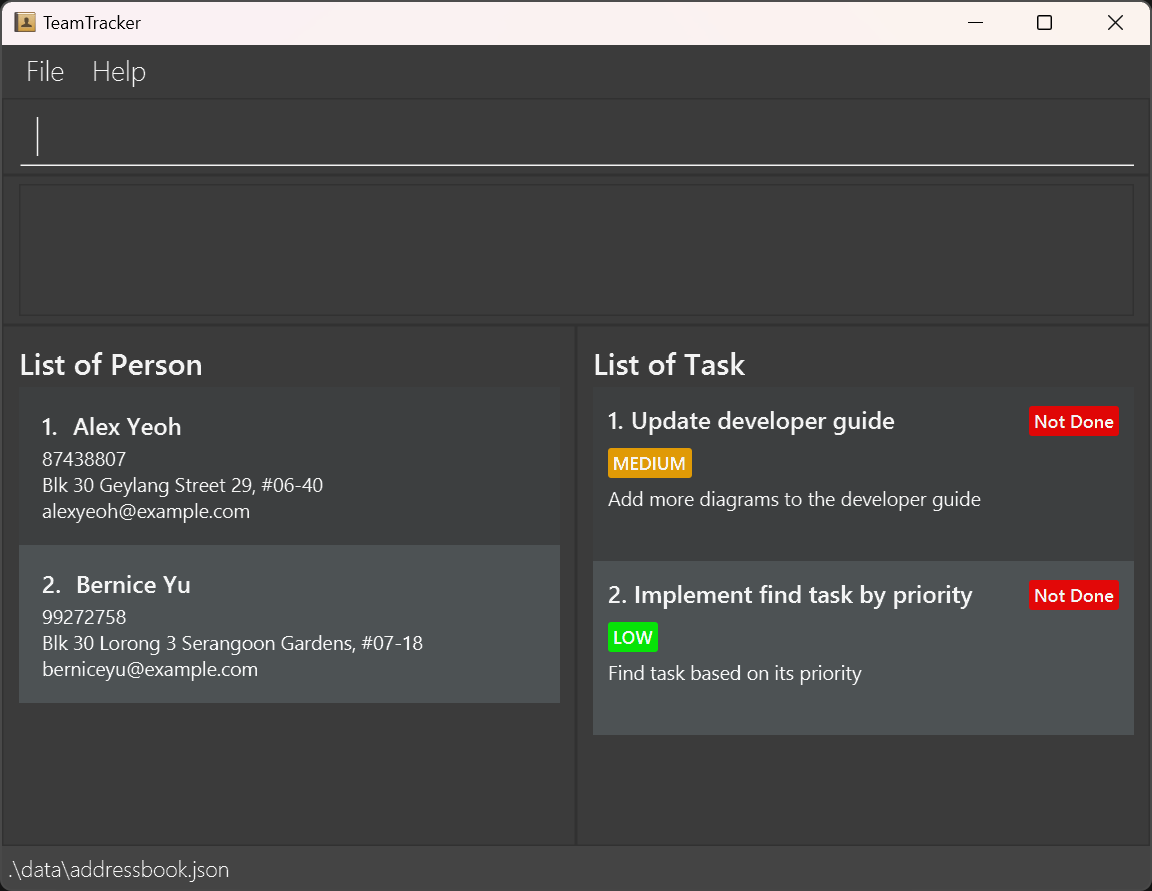
Congratulations, you are now a TeamTracker user! Get ready to take control of your tasks and contacts efficiently!
You can begin with the Basic tutorial section or refer to the Features section if you already had prior experience.
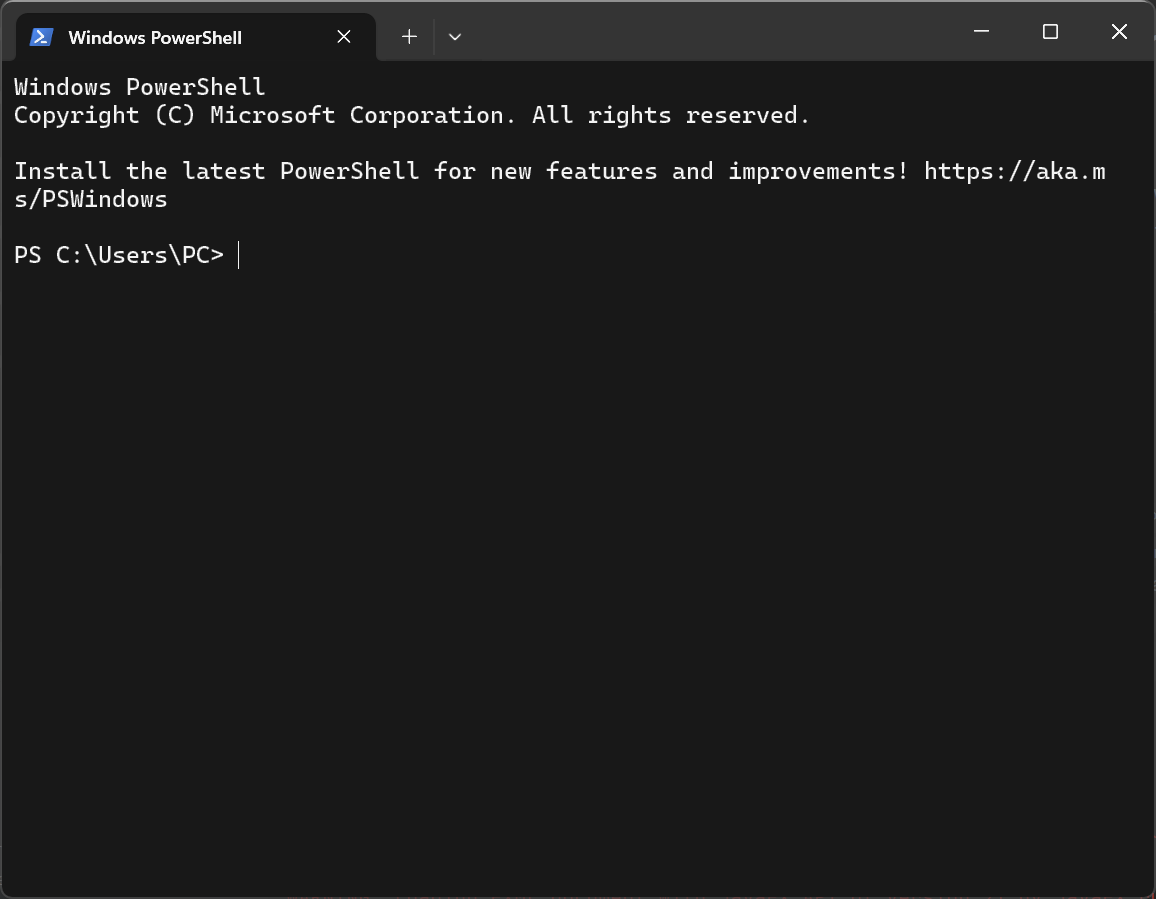
(If you have no experience on command terminal) Open and navigate the command terminal
Search for "Terminal", open the first app that popped up. A UI similar to the below should appear.
Go to the folder you put the file
TeamTracker.jar. Then, right-click on the jar file, select "Properties", and copy the details in the "Location:" field. Use the picture below for references.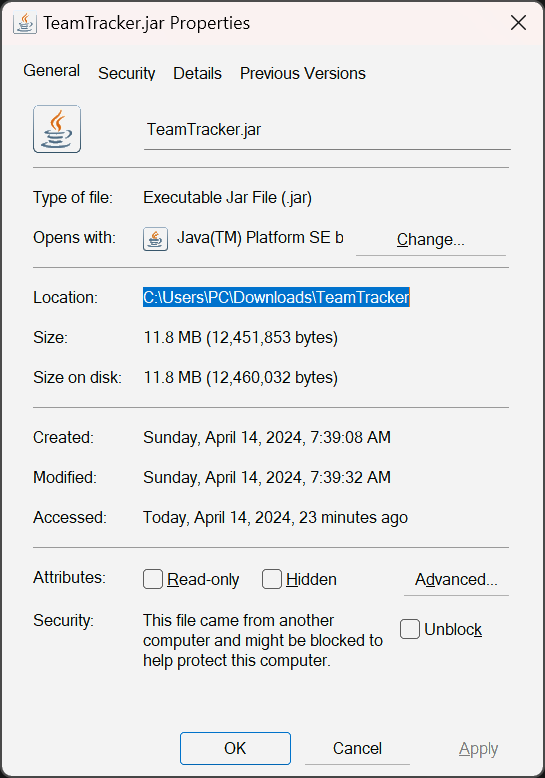
Go back to the Terminal, type
cdfollowed by a whitespace, then paste the location you just copied and Enter. Now you should be at the folder whereTeamTracker.jaris stored.Type
java -jar TeamTracker.jarthen Enter to run the application and the app User Interface should be displayed.
If not, you might run java -version to check the Java version of your computer before running the jar file.
Read the Quick start section again to check the Java version required for our app.
5. Congratulations, you are now a TeamTracker user! Get ready to take control of your tasks and contacts efficiently!
You can begin with the Basic tutorial section or refer to the Features section
if you already had prior experience.
Basic tutorial (for starters)
In this tutorial, we will guide you through the basics of using our app to manage your tasks efficiently. With TeamTracker, staying organized has never been easier. Let's get started!
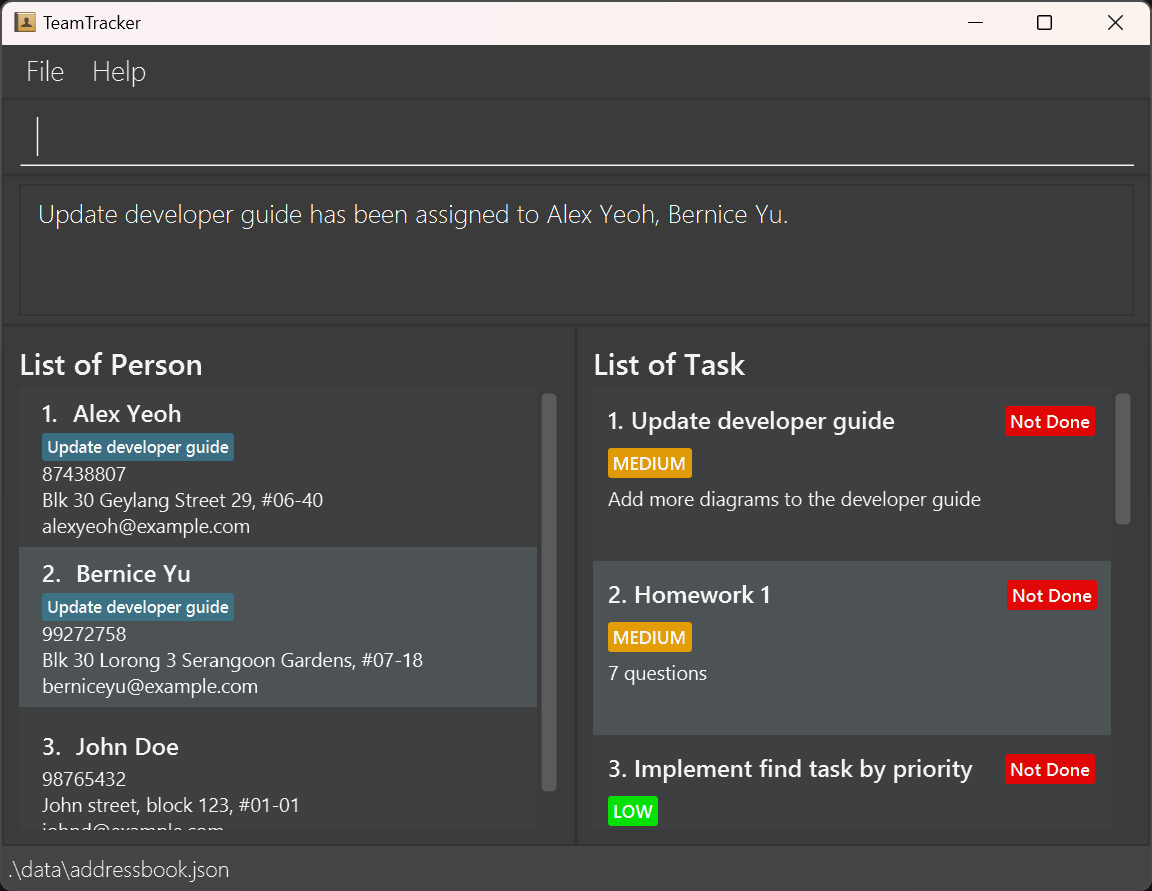
The image below is the application interface with more detailed annotations for you to gain a better understanding
of each part in our app.
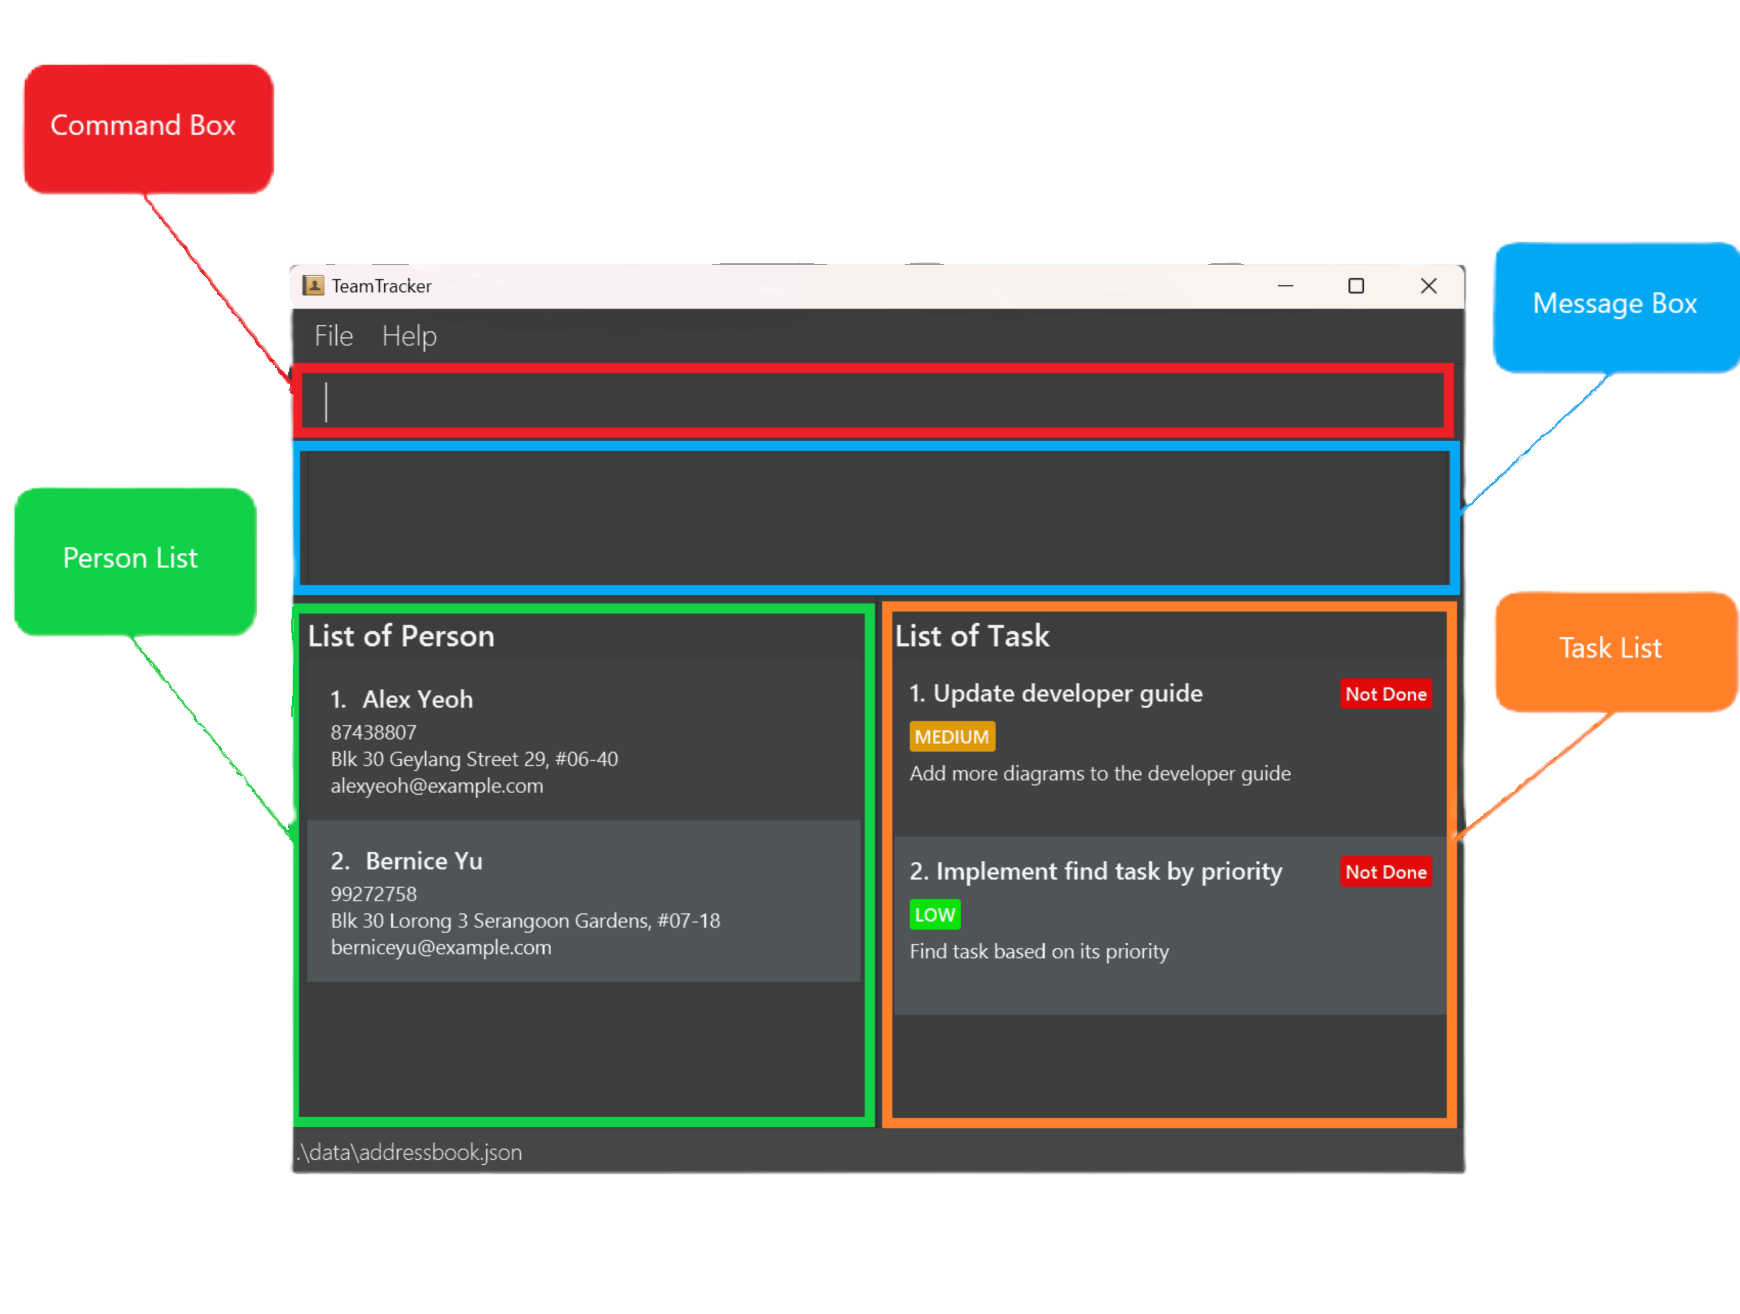
You can see that the UI is divided into four main parts:
- Command Box: This is where you enter your command into the app.
- Message Box: After you entered a command, the message showing the result of a command will be shown here.
- Person List: Displays the list of people stored in your app.
- Each person has a name that is displayed beside their number on the list. As names are the most natural way for you to distinct between people, we made it the most notable part for person so that you can look at different people with ease.
- Under the name are other personal information of a person. From top to bottom, they are phone number, address and email. These additional information are used when you need to contact a friend or group mate about any issues you might have.
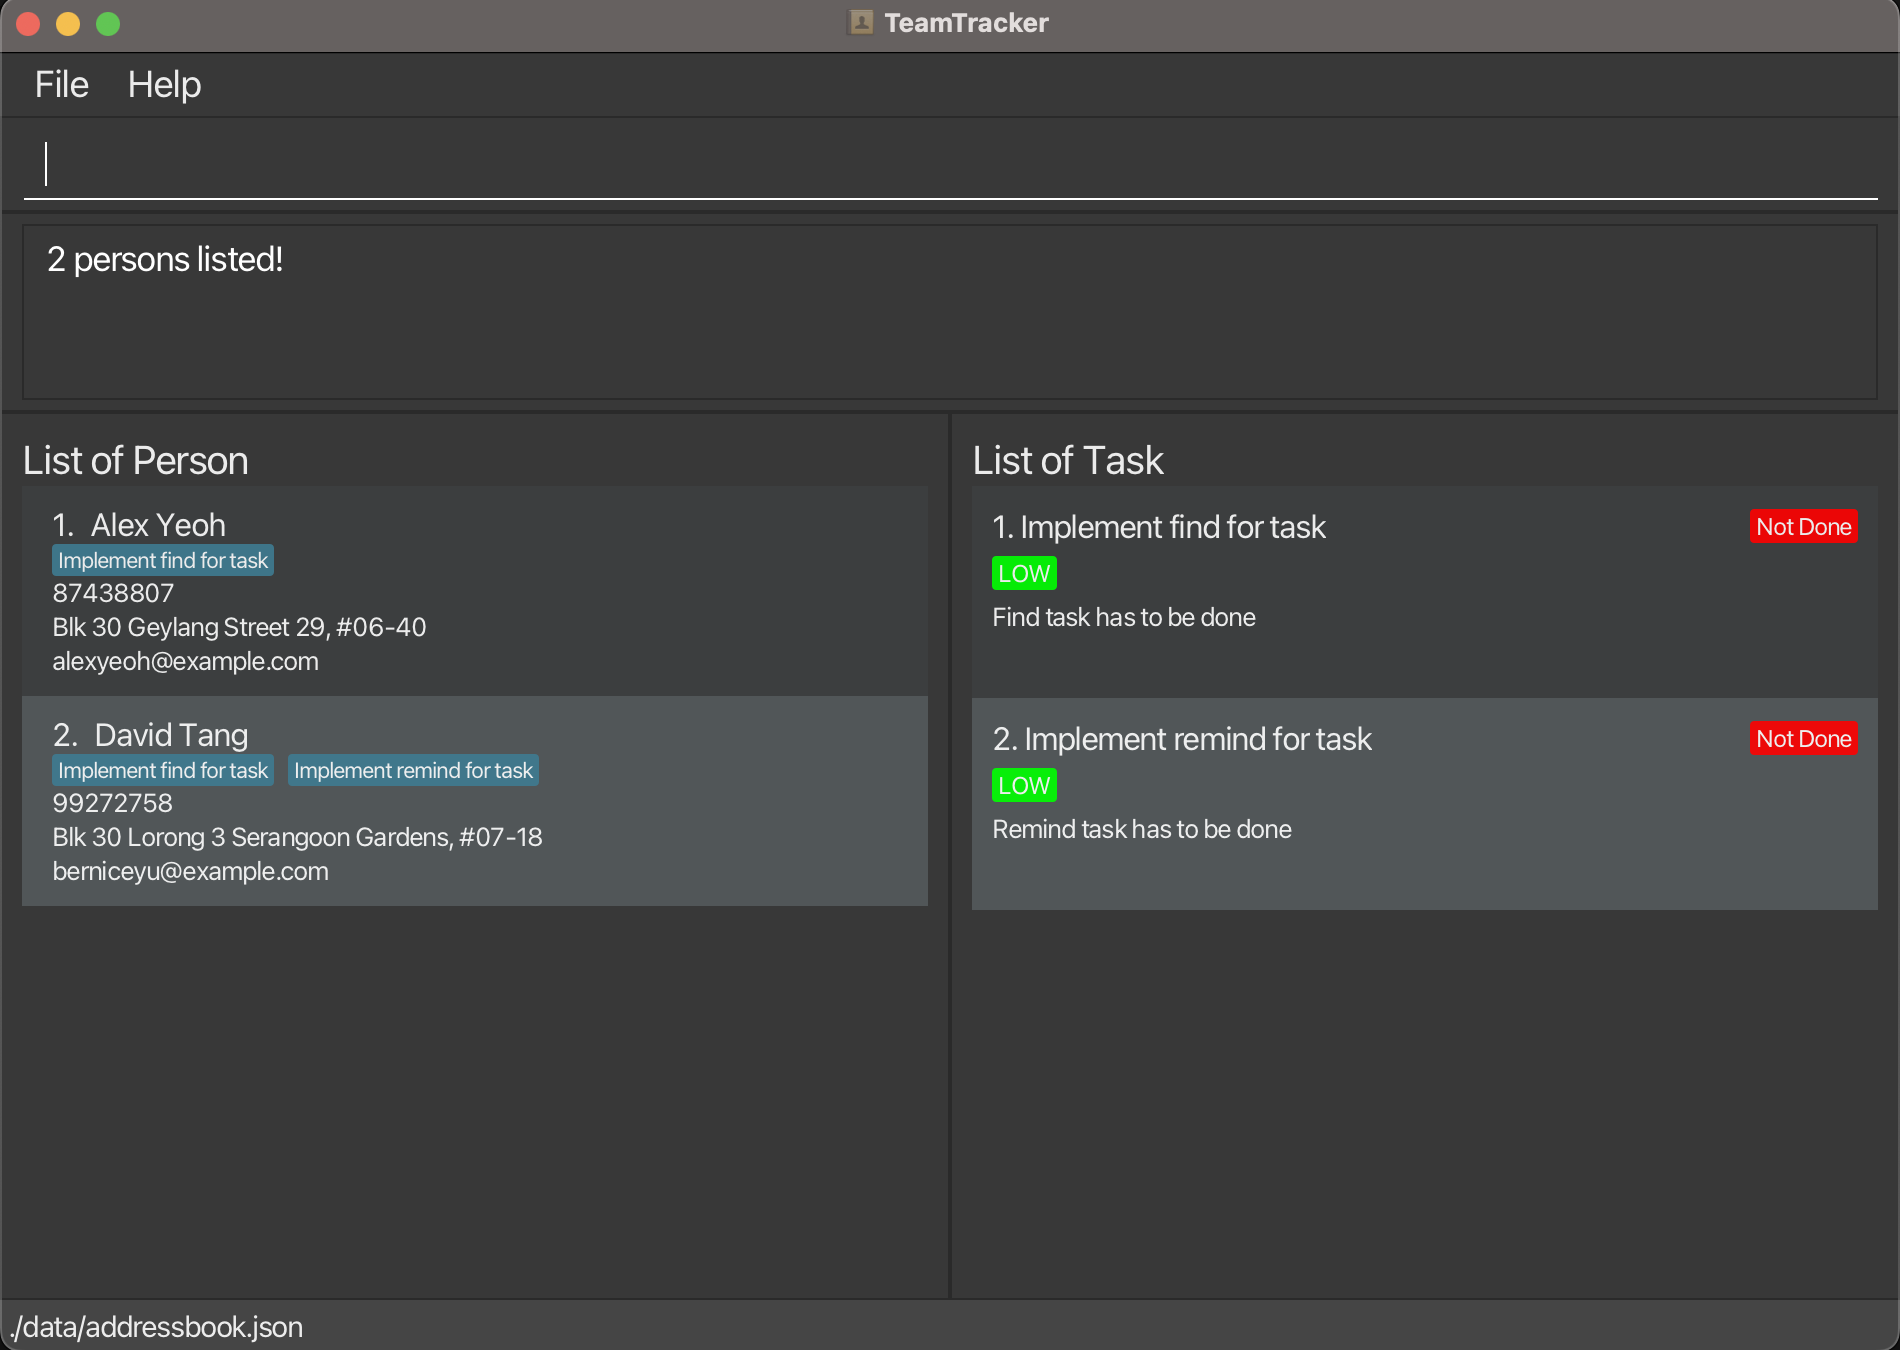
- Additional information that will be shown later is the tasks assigned to a person. When a task is assigned to a person, that task will be displayed as a block under the person's name. In this image, there are no tasks assigned to any person.
- Task List: Displays the list of tasks stored in your app.
- Each task has a task name beside their number on the list. Similar to person, names are the best way for you to distinct between tasks, so we choose it to be the most notable part in each task.
- Beside task name is another essential aspect for managing tasks, which is task status. A task can either be Done or Not Done. Therefore, when you look at tasks, you would prioritize tasks that are unfinished before those that are done already.
- Under the task name is task priority, which can be Low, Medium, or High. This also determines how important a task is so you can choose which one to finish first.
- Under the task priority is task description, which contains the details of a task that task name did not cover.
- Another additional information that was left out in this part is task deadline. Deadline contains a date and time and it tells you when a task is due so that you can plan accordingly.
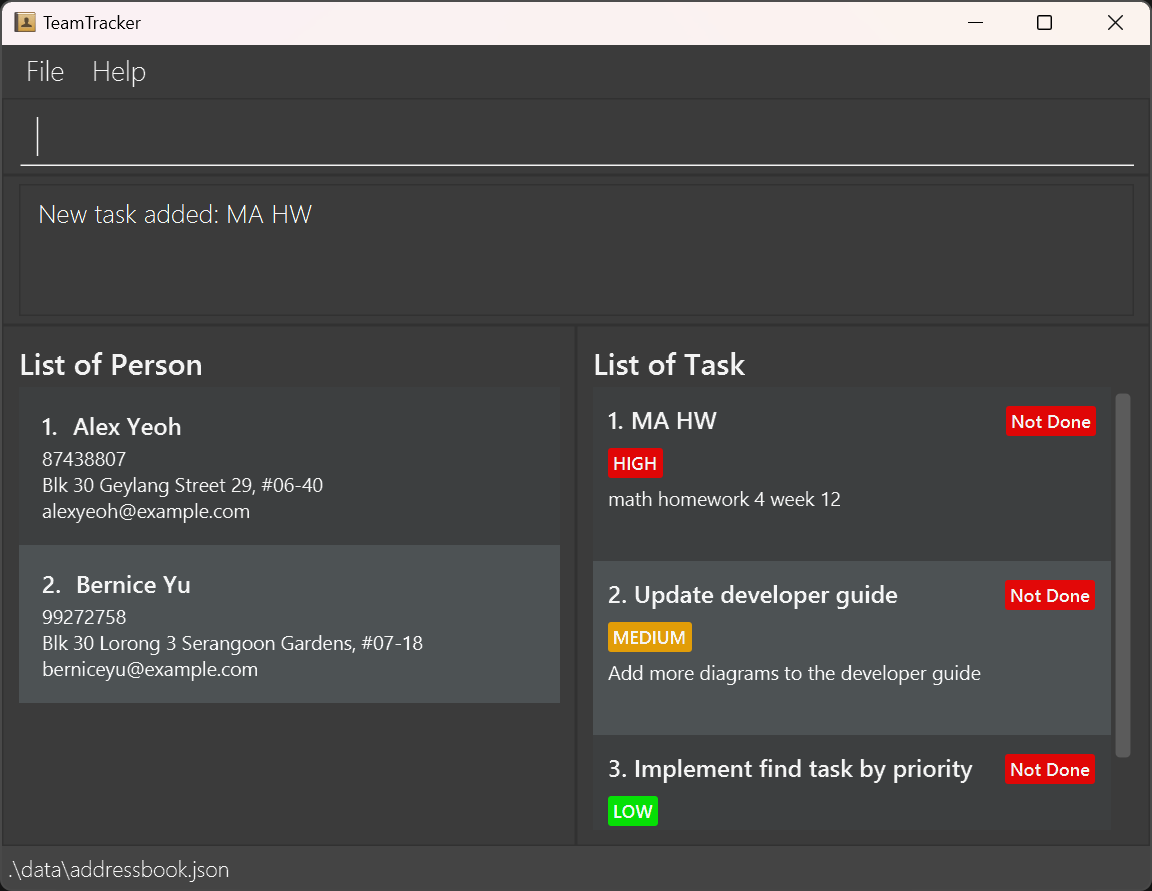
Now, let's try to add a task into our task list. Type addtask n/MA HW d/math homework 4 week 12 p/high into the
command box and press Enter. The result should be similar to this:
After you finish a task, you can mark that task as done. From the image above, you can see that the task "MA HW" is at
number 1 on the list. Therefore, to mark that task as done, type marktask 1 and this should be your result:
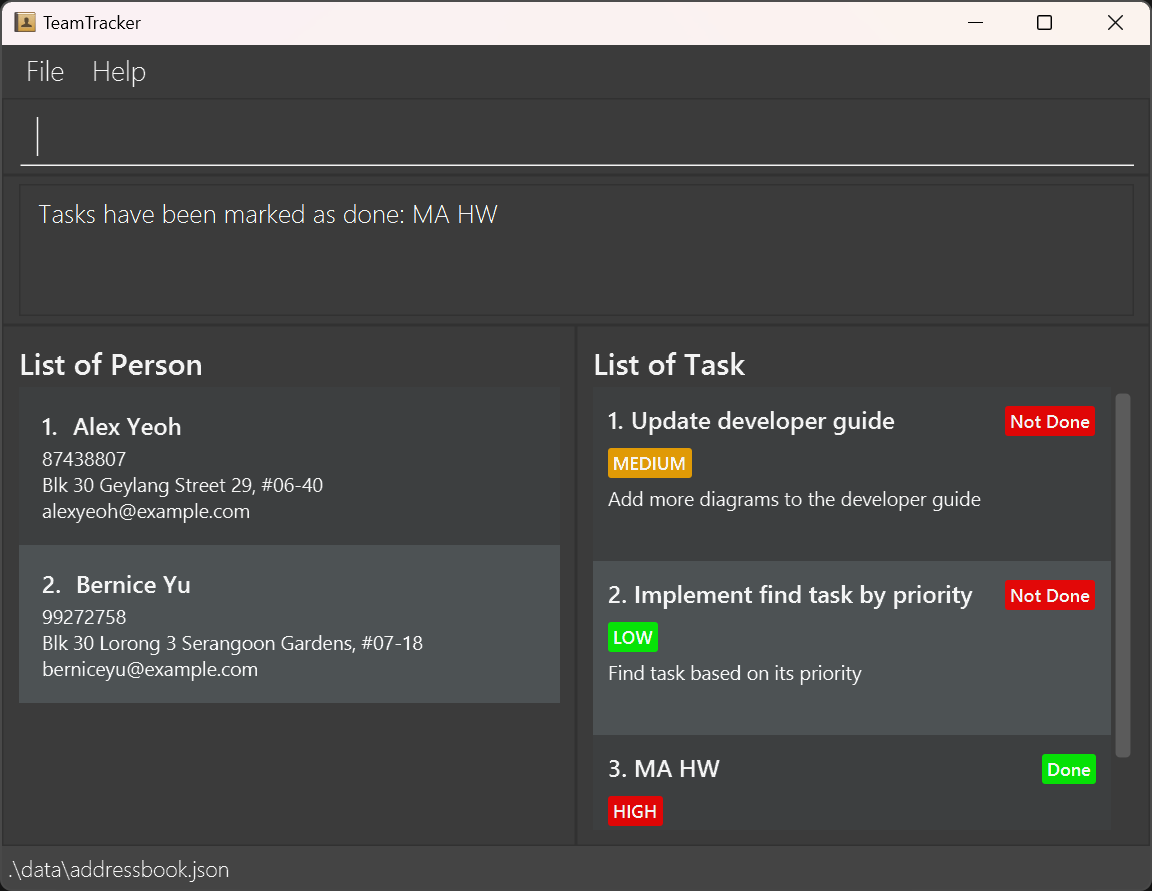
Here you might ask "Why is the task MA HW moved to number 3?". That is because we want you to see the tasks that you have not finished first when you look at the list. More details are given in the Notes about tasks order section.
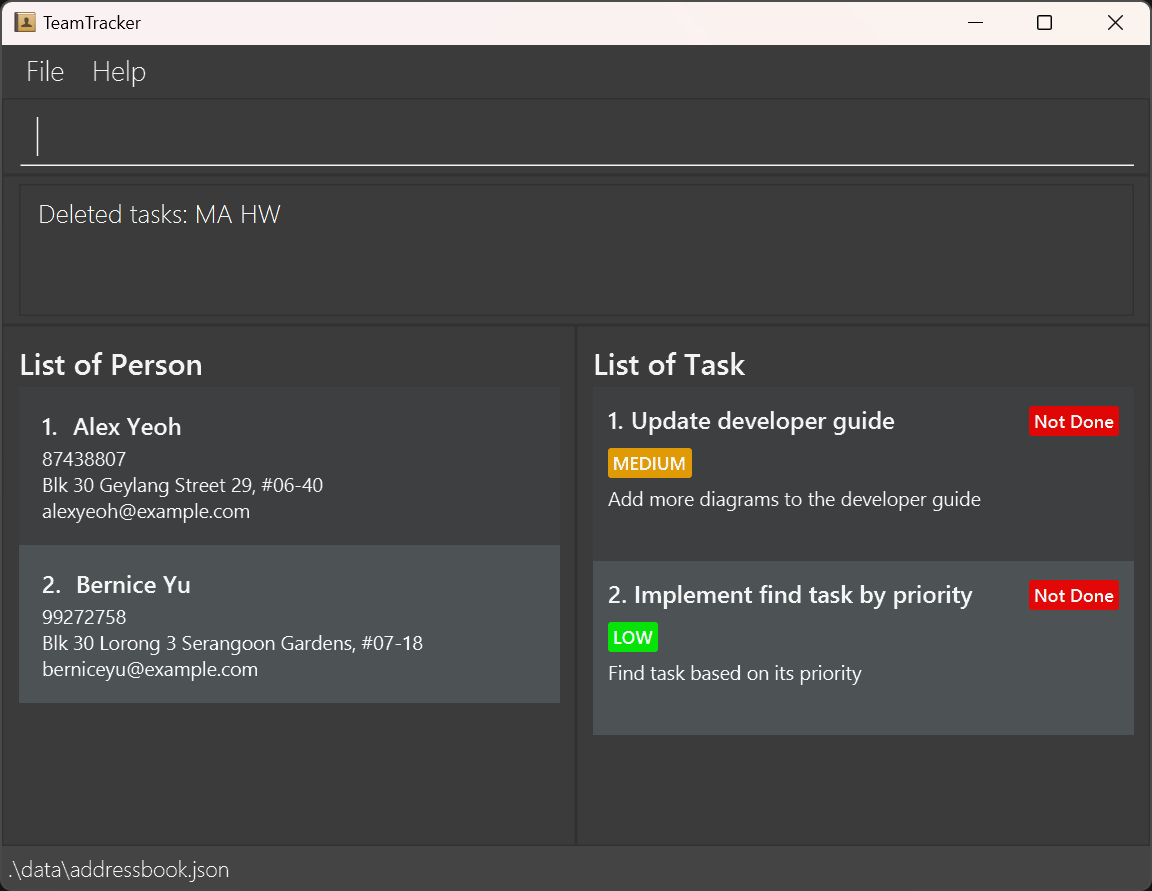
After you have finished the task "MA HW", you might no longer need to store that task in the app.
In that case, type deletetask 3 since the task is now at position number 3 on the list. And this is what
you should see:
Congratulations! You have learned how to add, mark, and delete tasks using TeamTracker. With these basic commands, you can start managing your tasks with ease.
For a comprehensive overview of all the powerful commands at your fingertips, be sure to check out the Features section to unlock the full potential of TeamTracker.
Features
Notes
Notes about tasks order
When managing tasks in TeamTracker, it's essential to understand the order in which tasks are displayed to ensure efficient organization:
- Tasks are first sorted based on their status, with those marked as "not done" appearing before those marked as "done." This prioritization allows users to focus on pending tasks before reviewing completed ones, facilitating better task management.
- Within each status category, tasks are sorted based on their priority level. Tasks with a high priority are displayed first, followed by those with a medium priority, and finally, tasks with a low priority. This hierarchy ensures that urgent tasks are prominently featured, allowing users to address critical matters promptly.
- In the event of a tie in priority level, tasks are further sorted by their deadline. Tasks with a closer deadline are displayed before later deadline. This is another factor for you to decide which task should be handled immediately.
- If all other factors result in a tie, tasks are further sorted lexicographically, based on their names then descriptions. This ensures a consistent and predictable order for tasks with the same priority, enabling users to easily locate specific tasks within their lists.
Notes about reading command guide
Each command in this guide are formatted with the following conventions:
- Description: This part tells you what the function of each command is.
- Format: How you should input each command into the app.
- Tips/Notes (if there is any): This part contains further details for the input of each command.
- Result: How the app will behave based on what input you give for each command.
Notes about the command format
Words in
UPPER_CASEare the parameters to be supplied by the user.
e.g. inadd n/NAME,NAMEis a parameter which can be used asadd n/Shi Kang.Items in square brackets are optional.
e.gn/TASK_NAME [by/DEADLINE]can be used asn/Task 1 by/23-12-2024 23:59or asn/Task 1.Parameters can be in any order.
e.g. if the command specifiesn/NAME p/PHONE_NUMBER,p/PHONE_NUMBER n/NAMEis also acceptable.Extraneous parameters for commands that do not take in parameters (such as
help,list,exitandclear) will be ignored.
e.g. if the command specifieshelp 123, it will be interpreted ashelp.These commands currently support mass operations, which means they can be applied on multiple inputs in one command, as long as you specified all inputs:
- delete
- assign
- unassign
- marktask
- unmarktask
- deletetask
If you are using a PDF version of this document, be careful when copying and pasting commands that span multiple lines as space characters surrounding line-breaks may be omitted when copied over to the application.
Managing Person
Adding a person: add
Adds a person to the person list.
Format: add n/NAME p/PHONE_NUMBER e/EMAIL a/ADDRESS
Tip:
- Names should only contain alphanumeric characters and spaces, and it should not be blank.
- Phone numbers should only contain numbers, and it should be at least 3 digits long.
- Emails must be in the format local-part@domain.
- A person can have any number of tasks assigned (including 0)
Result:
- If all input you provided is valid, that person will be added to the person list with their respective personal information.
- If any of the input (names, phone numbers, emails, address) you provided is invalid, the respective error message for that invalid input will appear, so that you know how to change your input accordingly,
- If any of the input (names, phone numbers, emails, address) is missing, the invalid command format message will be shown, along with the correct format for the command.
Examples:
add n/John Doe p/98765432 e/johnd@example.com a/John street, block 123, #01-01add n/Betsy Crowe e/betsycrowe@example.com a/Newgate Prison p/1234567
Listing all persons : list
Shows a list of all persons stored.
Format: list
Result: Show the full person list.
Example: list
Editing a person : edit
Edits an existing person in the list.
Format: edit PERSON_INDEX [n/NAME] [p/PHONE] [e/EMAIL] [a/ADDRESS]
Notes:
- Edits the person at the specified
INDEX. The index refers to the index number shown in the displayed person list. The index must be a positive integer 1, 2, 3, … - At least one of the optional fields must be provided.
- Existing values will be updated to the input values for that respective field.
Result:
- If no fields are provided, an error message will be displayed.
- Otherwise, the app replaces the value in the field you specified with the value you provided.
Examples:
edit 1 p/91234567 e/johndoe@example.comEdits the phone number and email address of the 1st person to be91234567andjohndoe@example.comrespectively.edit 2 n/Betsy CrowerEdits the name of the 2nd person to beBetsy Crower.
Locating persons by name: find
Finds persons whose names contain any of the given keywords.
Format: find KEYWORD [MORE_KEYWORDS]
Notes:
- The search is case-insensitive. e.g
hanswill matchHans - The order of the keywords does not matter. e.g.
Hans Bowill matchBo Hans - Only the name is searched.
- Only full words will be matched e.g.
Hanwill not matchHans - Persons matching at least one keyword will be returned (i.e.
ORsearch). e.g.Hans Bowill returnHans Gruber,Bo Yang
Result:
- If no matching name is found, an empty list is displayed
- If the search find at least one person, all person found will be displayed as a list and they are sorted by their names lexicographically.
Examples:
find JohnreturnsjohnandJohn Doefind alex davidreturnsAlex Yeoh,David Li
Deleting a person : delete
Deletes the specified persons from the address book.
Format: delete PERSON_INDEX [MORE_PERSON_INDICES]
Notes:
- Duplicate indices will be removed, e.g.
delete 1 1is the same asdelete 1. - The order of the indices does not matter, e.g.
delete 1 2is the same asdelete 2 1. - The indices refer to the index numbers shown in the displayed person list.
- The indices must be positive integers 1, 2, 3, ...
- If at least one of the indices are invalid, the command fails, e.g.
listfollowed bydelete 1 2fails if there is only one person in the address book.
Result:
- If one of the
INDEXyou provided is not on the displayed list, an error message will be shown. It will tell you the index you provided is invalid - Otherwise, the person(s) with the index(or indices) you provide on the displayed person list is/are deleted.
Examples:
listfollowed bydelete 1 2deletes the first two persons in the address book.find Betsyfollowed bydelete 1deletes the 1st person in the results of thefindcommand.
Clearing all entries : clear
Clears all entries from the address book.
Format: clear
Result: delete all person on the person list.
Managing task
Adding a task: addtask
- Adds a task to the task list with three levels of priority (LOW, MEDIUM, HIGH).
- Priority can also be in integers (1-Low, 2-Medium, 3-High).
- The deadline is optional for the adding of tasks.
Format: addtask n/TASK_NAME d/TASK_DESCRIPTION p/TASK_PRIORITY [by/TASK_DEADLINE]
Notes:
- Task name can be any characters, not just alphanumeric. Same for task description.
- Task priority currently has three values: Low, Medium, or High, and their respective numerical values are 1, 2, and 3. Therefore, for priority, you can use both low, medium and high or 1, 2, 3 respectively.
- Task deadline must be in the format
dd-MM-yyyy HH:mm.
Result:
- If any of the compulsory input is missing, an error message of invalid command format will appear.
- If task priority are specified with a value different from the {low, medium, high, 1, 2, 3} set, an error message about task priority will be shown.
- If the deadline is not in the correct DateTime format, an error message about deadline will be displayed.
- Otherwise, if all the inputs are valid, a new task is added to the task list using the information provided.
Examples:
addtask n/Task 1 d/Do homework p/HIGHaddtask n/Task 1 d/Do homework p/1addtask n/Task 1 d/Do homework p/HIGH by/12-12-2024 23:59
Assigning a task: assign
Assigns a task to persons.
Format: assign TASK_INDEX to/PERSON_INDEX [MORE_PERSON_INDICES]
Notes:
- Duplicate person indices will be removed, e.g.
assign 1 to/1 1is the same asassign 1 to/ 1. - The order of the person indices does not matter, e.g.
assign 1 to/1 2is the same asassign 1 to/2 1. - The task/person indices refer to the index numbers shown in the displayed task/person list.
- The indices must be positive integers 1, 2, 3, ...
- If at least one of the indices are invalid, the command fails, e.g.
listfollowed byassign 1 to/1 2fails if there is only one person in the address book. - If a specified person is already assigned the task, the command still succeeds, and no change will occur to the person.
Result:
- If at least one of the index provided is invalid, an error message will be displayed.
- Otherwise, the task assigned will be shown under each assigned person's name.
Examples:
listandlisttaskfollowed byassign 1 to/1 2assigns the 1st task in the task list to the first two persons in the address book.find Betsyandfindtask implementfollowed byassign 1 to/1assigns the 1st task in the results of thefindtaskcommand to the 1st person in the results of thefindcommand.
Unassigning a task: unassign
Unassigns a task to persons.
Format: unassign TASK_INDEX to/PERSON_INDEX [MORE_PERSON_INDICES]
Notes:
- Duplicate person indices will be removed, e.g.
unassign 1 to/1 1is the same asunassign 1 to/ 1. - The order of the person indices does not matter, e.g.
unassign 1 to/1 2is the same asunassign 1 to/2 1. - The task/person indices refer to the index numbers shown in the displayed task/person list.
- The indices must be positive integers 1, 2, 3, ...
- If at least one of the indices are invalid, the command fails, e.g.
listfollowed byunassign 1 to/1 2fails if there is only one person in the address book. - If a specified person is already not assigned the task, the command still succeeds, and no change will occur to the person.
Result:
- If at least one of the index provided is invalid, an error message will be displayed.
- Otherwise, that task under each assigned person's name will be deleted and the person(s) is/are unassigned from the task.
Examples:
listandlisttaskfollowed byunassign 1 to/1 2unassigns the 1st task in the task list to the first two persons in the address book.find Betsyandfindtask implementfollowed byunassign 1 to/1unassigns the 1st task in the results of thefindtaskcommand to the 1st person in the results of thefindcommand.
Clearing all tasks of a person: cleartask
Clears all tasks of a person.
Format: cleartask PERSON_INDEX
Result: Delete all tasks assigned to a person
Examples
cleartask 1
Marking tasks: marktask
Marks a task in the task list as Done.
Format: marktask TASK_INDEX [MORE_TASK_INDICES]
Notes:
- Duplicate indices will be removed, e.g.
marktask 1 1is the same asmarktask 1. - The order of the indices does not matter, e.g.
marktask 1 2is the same asmarktask 2 1. - The indices refer to the index numbers shown in the displayed task list.
- The indices must be positive integers 1, 2, 3, ...
- If at least one of the indices are invalid, the command fails, e.g.
listfollowed bymarktask 1 2fails if there is only one task in the task list. - If a specified task is already marked as done, the command still succeeds, and no change will occur to the task.
Result:
- If at least one of the index provided is invalid, an error message will be displayed.
- Otherwise, the task(s) at the index (or indices) provided will be marked as Done
Examples:
listfollowed bymarktask 1 2marks the first two tasks in the task list as done.findtask implementfollowed bymarktask 1marks the 1st task in the results of thefindcommand as done.
Unmarking a task: unmarktask
Marks a task in the task list as Not Done.
Format: unmarktask TASK_INDEX [MORE_TASK_INDICES]
Notes:
- Duplicate indices will be removed, e.g.
unmarktask 1 1is the same asunmarktask 1. - The order of the indices does not matter, e.g.
unmarktask 1 2is the same asunmarktask 2 1. - The indices refer to the index numbers shown in the displayed task list.
- The indices must be positive integers 1, 2, 3, ...
- If at least one of the indices are invalid, the command fails, e.g.
listfollowed byunmarktask 1 2fails if there is only one task in the task list. - If a specified task is already marked as not done, the command still succeeds, and no change will occur to the task.
Result:
- If at least one of the index provided is invalid, an error message will be displayed.
- Otherwise, the task(s) at the index (or indices) provided will be marked as Not Done.
Examples:
listfollowed byunmarktask 1 2marks the first two tasks in the task list as not done.findtask implementfollowed byunmarktask 1marks the 1st task in the results of thefindcommand as not done.
Deleting a task: deletetask
Deletes the specified tasks from the task list.
Format: deletetask TASK_INDEX [MORE_TASK_INDICES]
Notes:
- Duplicate indices will be removed, e.g.
deletetask 1 1is the same asdeletetask 1. - The order of the indices does not matter, e.g.
deletetask 1 2is the same asdeletetask 2 1. - The indices refer to the index numbers shown in the displayed task list.
- The indices must be positive integers 1, 2, 3, ...
- If at least one of the indices are invalid, the command fails, e.g.
listtaskfollowed bydeletetask 1 2fails if there is only one task in the task list.
Result:
- If at least one of the index provided is invalid, an error message will be displayed.
- Otherwise, the task at the given index (or indices) are deleted.
Examples:
listtaskfollowed bydeletetask 1 2deletes the first two tasks in the task list.findtask implementfollowed bydeletetask 1deletes the 1st task in the results of thefindtaskcommand.
Editing a task: edittask
Edits an existing task in the task list.
Format: edittask TASK_INDEX [n/TASK_NAME] [d/TASK_DESCRIPTION] [p/TASK_PRIORITY] [by/TASK_DEADLINE]
Notes:
- Edits the task at the specified
TASK_INDEX. The index refers to the index number shown in the displayed task list. The index must be a positive integer 1, 2, 3, … - At least one of the optional fields must be provided.
- Existing values will be updated to the input values.
Result:
- If the
TASK_INDEXprovided is invalid, an error message is displayed. - If no optional fields are provided, an error message is displayed.
- Otherwise, the app replaces the value in the field you specified with the value you provided.
Examples:
edittask 1 p/highedittask 2 d/new description by/04-04-2024 10:33edittask 3 n/new task d/new description p/low by/04-04-2024 10:33
Listing the tasks: listtask
Shows a list of all tasks in the task list.
Format: listtask
Result: List all tasks stored in the app.
Examples:
listtask
Finding a task or tasks by task name: findtask
Finds tasks which names contain any of the given keywords.
Format: findtask KEYWORD [MORE_KEYWORDS]
Notes:
- The search is case-insensitive. e.g
2103twill match2103T - The order of the keywords does not matter. e.g.
findpriority implementwill matchimplement findpriority - Only the task name is searched.
- Only full words will be matched e.g.
priowill not matchpriority - Tasks matching at least one keyword will be returned (i.e.
ORsearch). e.g.2103t 2101will return2101 CA3,2103t milestone
Result:
- If no matching task name is found, an empty list is displayed.
- If the search find at least one task, all tasks found will be displayed as a sorted task list.
Examples:
findtask implementreturnsimplement findpriorityandimplement mass opsfindtask cs2103t cs2101returnsCS2101 CA3,CS2103T developer guide
Others
Viewing help : help
Shows a message explaining how to access the help page (the User Guide).

Format: help
Result: Display a box that contains the link to the User Guide.
Exiting the program : exit
Exits the program.
Format: exit
Result: Close the app.
Saving the data
AddressBook and TaskList data are saved in the hard disk automatically after any command that changes the data. There is no need to save manually.
Editing the data file
AddressBook data are saved automatically as a JSON file [JAR file location]/data/addressbook.json.
TaskList data are saved automatically as a JSON file [JAR file location]/data/tasklist.json.
Advanced users are welcome to update data directly by editing the data files.
Caution:
If your changes to the data file makes its format invalid, TeamTracker will discard all data and start with an
empty data file at the next run. Hence, it is recommended to take a backup of the file before editing it.
Furthermore, certain edits can cause the TeamTracker to behave in unexpected ways (e.g., if a value
entered is outside the acceptable range). Therefore, edit the data file only if you are
confident that you can update it correctly.
Future updates
Create group [coming in v2.0]
The Create group command enables users to select a list of unique individuals from their contacts and
create a group comprising those chosen members.
Clear task list [coming in v2.0]
This command will be very similar to the clear command, but instead of clearing the person list, this command would
clear the task list instead.
Undo a command [coming in v2.0]
The Undo command in TeamTracker offers users the convenience of reverting the most recent action with a
simple command. Whether an accidental deletion or unintended modification, this feature provides you a quick
and efficient way to backtrack the last action, restoring the previous state effortlessly.
FAQ
Q: How do I transfer my data to another Computer?
A: Install the app in the other computer and overwrite the empty data file it creates with the file that contains the data of your previous TeamTracker home folder.
Q: Why is there no way to delete only the deadline of a task?
A: Currently we do not have a command that supports such specific task. However, one alternative to achieve your
desired result is to delete the task you want to remove the deadline, then add that task again with all the old fields
except for deadline. The process is somewhat tedious, but it gives you what you desired.
Known issues
- When using multiple screens, if you move the application to a secondary screen, and later switch to using only the primary screen, the GUI will open off-screen. The remedy is to delete the
preferences.jsonfile created by the application before running the application again.
Command summary
| Action | Format, Examples |
|---|---|
| Add | add n/NAME p/PHONE_NUMBER e/EMAIL a/ADDRESS e.g., add n/James Ho p/22224444 e/jamesho@example.com a/123, Clementi Rd, 1234665 |
| List | list |
| Edit | edit PERSON_INDEX [n/NAME] [p/PHONE_NUMBER] [e/EMAIL] [a/ADDRESS] e.g., edit 2 n/James Lee e/jameslee@example.com |
| Find | find KEYWORD [MORE_KEYWORDS] e.g., find James Jake |
| Delete | delete PERSON_INDEX [MORE_PERSON_INDICES] e.g., delete 3 |
| Clear | clear |
| Add Task | addtask n/TASK_NAME d/TASK_DESCRIPTION p/TASK_PRIORITY [by/TASK_DEADLINE] e.g., addtask n/Task 1 d/Do homework p/HIGH by/12-12-2024 23:59 |
| Assign Task | assign TASK_INDEX to/PERSON_INDEX [MORE_PERSON_INDICES] e.g., assign 1 to/1 |
| Unassign Task | unassign TASK_INDEX to/PERSON_INDEX [MORE_PERSON_INDICES]e.g., unassign 1 to/1 2 |
| Clear Person Task | cleartask PERSON_INDEX e.g., cleartask 3 |
| Mark Task | marktask TASK_INDEX [MORE_TASK_INDICES] e.g., marktask 3 |
| Unmark Task | unmarktask TASK_INDEX [MORE_TASK_INDICES] e.g., unmarktask 3 |
| Delete Task | deletetask TASK_INDEX [MORE_TASK_INDICES e.g., deletetask 3 |
| Edit Task | edittask TASK_INDEX [n/TASK_NAME] [d/TASK_DESCRIPTION] [p/TASK_PRIORITY] [by/TASK_DEADLINE] e.g., edittask 1 p/high |
| List Task | listtask |
| Find Task | findtask KEYWORD [MORE_KEYWORDS] e.g., findtask 2101 2103t |
| Help | help |
| Exit | exit |